To setup svn and checkout repository in Android Studio 2.2.2 for Mac, we have to follow simple few steps.

Step 1: Go to Android Studio Preferences > Version Control > Subversions
Select checkbox for command line client
Now, type `svn` in the box.
click on 'Apply' and 'Save'
Step 2: From the top menu, VCS > Checkout from Version Control

Paste SVN path in the under repository path after hitting ‘+’ button.
Then you can see you repository listed for checkout.
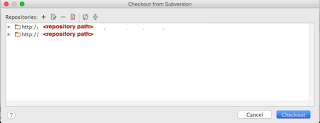
If you expand the newly added repository, can see all the folders. Click on parent folder and click 'Checkout' to your work space.
Step 1: Go to Android Studio Preferences > Version Control > Subversions
Select checkbox for command line client
Now, type `svn` in the box.
click on 'Apply' and 'Save'
Step 2: From the top menu, VCS > Checkout from Version Control
Paste SVN path in the under repository path after hitting ‘+’ button.
Then you can see you repository listed for checkout.

If you expand the newly added repository, can see all the folders. Click on parent folder and click 'Checkout' to your work space.